Project Calico is a Layer 3 software defined network that runs well on DC/OS and Mesos. In this blog post we will walk through installing and configuring it on DC/OS 1.9. That will allow us to attach containers to Calico and receive unique IPs for them. We will also examine the security implications and policies that can be applied.
DC/OS 1.9 supports 2 ways of running your containers:
- Docker daemon - with the pros and cons that come with that
- UCR (Universal Container Runtime) - the new and future proof way to run not only native workloads but also packaged Docker images.
Our interest is with UCR and its ability to work with the CNI (Container Network Interface) open container networking standard.
Prerequisites
- Running DC/OS cluster 1.9 with at least 3 private nodes. Either OSS or EE version will work.
- SSH access to all nodes in your cluster
- DC/OS CLI installed on your local machine and authenticated against the cluster. Also, an ssh-agent started with your key added so you can utilize
dcos node sshcommands.
Installation
- Install the etcd package from the Universe, wait until all of its nodes are functional (it takes about 10 minutes on AWS)
[laptop ~]$ dcos package install etcd --yes
This DC/OS Service is currently in preview. In order for etcd to start successfully all resources must be available in the cluster including ports, CPU shares and RAM.
We recommend a minimum of 3 nodes with 1 CPU share and 128 MB of RAM available for use by the etcd service.
Note that the service is alpha and there may be bugs, including possible data loss, incomplete features, incorrect documentation or other discrepancies.
Installing Marathon app for package [etcd] version [0.0.3]
Once the cluster initializes (<1 minute if offers are available), etcd proxies may connect by passing the argument -discovery-srv=etcd.mesos (or -discovery-srv=<framework-name>.mesos if you're not using the default), and you may discover live members by querying SRV records for _etcd-server._tcp.<framework-name>.mesos
- Install the Calico framework installer. This will also take long time and it will involve restarting of the private agents processes. Give it at least 20 minutes.
[laptop ~]$ dcos package install calico --yes
This DC/OS Service is currently in preview. Before installing Calico, ensure the DC/OS etcd package is installed (if not using own etcd server). Note: this scheduler may makes permament changes to all Agents and Docker Daemons in the cluster. Calico's DC/OS installation framework is currently in beta.
Installing Marathon app for package [calico] version [0.4.0]
Calico services are now running on your cluster. Follow the Calico DC/OS guide available at https://github.com/projectcalico/calico-containers/blob/master/docs/mesos/dcos.md
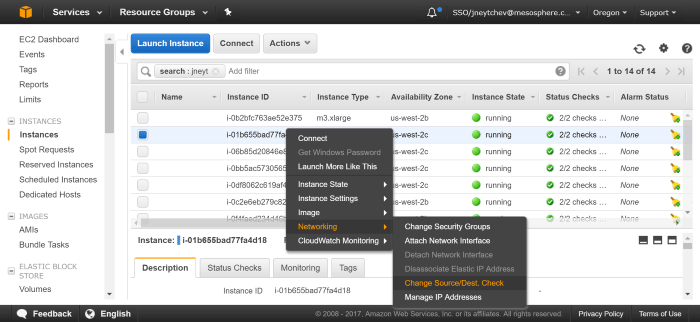
- If your cluster is running in AWS, please disable the Source/Destination Checks on all of your private nodes. To do so log into the AWS EC2 interface, right click on each of the instances that are used as private nodes and select Networking / Change Source/Dest. Check, [Yes, Disable]
Accessing services in your containers
Once you start using Calico for IP assignment to your containers you can make use of the automatic service discovery that comes baked in with DC/OS. This will allow you to refer to your (group of) containers by their service name instead of IP addresses. You get 2 choices of what those URLs can look like:
<service-name>.marathon.containerip.dcos.thisdcos.directory- this one is available out of the box, no additional configuration needed<service-name>.marathon.mesos- you will have to make a change to Mesos-DNS on your master nodes in order to get this working.
Mesos-DNS change (if desired)
To get Mesos-DNS to resolve URLs in the form of
SSH log in to all of your master nodes and edit this file:
OSS DC/OS
[masterN ~]$ sudo vi /opt/mesosphere/etc/mesos-dns.json
EE DC/OS
[masterN ~]$ sudo vi /opt/mesosphere/etc/mesos-dns-enterprise.json
Swap the places of “host” and “netinfo” in the IPSources setting, so it reads:
"IPSources": ["netinfo", "host"]
Restart the Mesos-DNS service
sudo systemctl restart dcos-mesos-dns
Attaching containers to Calico’s network via CNI
The Calico installation package creates a default network called “calico” to which we will attach our containers via CNI. The configuration file for it can be found on all private and public nodes under /opt/mesosphere/etc/dcos/network/cni/calico.cni.
Note that if you want to add another network, you would have to create another .cni file in that directory and restart the dcos-mesos-slave (dcos-mesos-slave-public on public nodes) on each node.
We can tell Marathon to attach our containers to the “calico” network by specifying the following snippet in the service definition:
"ipAddress": {
    "networkName": "calico",
    "labels": {
      "<key1>": "<value1>",
      "<key2>": "<value2>"
    }
}
Here networkName tells Marathon to assign USER - CNI type of networking to the container and attach it to a network called “calico”.
The IP address will be assigned automatically and the container will be tagged with the key-value pairs inside the labels section. Those key-value pairs will come in handy later when we design our security policy.
By default, all containers assigned to the same Calico network will be able to talk to each other. In practice, this is not secure at all, so we will create a policy that will allow us to split our containers in logical groups with isolation between them.
Simple Use Case
Consider the following set up for a simplistic application :
- front end, running a web server container with our fictitious microservice
- database running in a container that provides data storage for the microservice
- tester container that has diagnostic tools that know how to talk to both the front end and the database
We want to have 2 environments that are completely separate from each other.
- development which exposes the front end to our company-wide LAN
- production which offers the front end to the Internet
Based on what we learned about attaching containers to Calico, we can spin up the following containers:
- prod-frontend.json
Here we request an Nginx Docker image to be run in our UCR, connected to a CNI based network called “calico”. We are also opening port 80 on the resulting IP address.
{
    "id": "frontend",
    "container": {
      "type": "MESOS",
      "docker": {
        "image": "nginx:alpine"
      }
    },
    "instances": 1,
    "cpus": 0.1,
    "mem": 64.0,
    "ipAddress": {
        "networkName": "calico",
        "labels": {
          "app": "frontend",
          "group": "production"
        },
        "discovery": { "ports": [{ "name": "http", "number": 80, "protocol": "tcp" }]}
    }
}
- prod-tester.json
This Docker images comes with a few networking tools that we will make use of to inspect our front end and database.
{
    "id": "tester",
    "container": {
      "type": "MESOS",
      "docker": {
        "image": "donch/net-tools"
      }
    },
    "instances": 1,
    "cmd": "ifconfig && sleep 4h",
    "cpus": 0.1,
    "mem": 64.0,
    "ipAddress": {
        "networkName": "calico",
        "labels": {
          "app": "tester",
          "group": "production"
        }
    }
}
- prod-database.json
This is an H2 docker image that exposes ports 1521 (database connection) and 81 (UI).
{
    "id": "database",
    "container": {
      "type": "MESOS",
      "docker": {
        "image": "oscarfonts/h2"
      }
    },
    "instances": 1,
    "cpus": 0.3,
    "mem": 128.0,
    "ipAddress": {
        "networkName": "calico",
        "labels": {
          "app": "database",
          "group": "production"
        },
        "discovery": {
            "ports": [
                { "name": "database", "number": 1521, "protocol": "tcp" },
                { "name": "http", "number": 81, "protocol": "tcp" }
            ]
        }
    }
}
Similarly, the containers running in our development would look like so:
dev-frontend.json
{
"id": "frontend2",
"container": {
  "type": "MESOS",
  "docker": {
    "image": "nginx:alpine"
  }
},
"instances": 1,
"cpus": 0.1,
"mem": 64.0,
"ipAddress": {
    "networkName": "calico",
    "labels": {
      "app": "frontend",
      "group": "development"
    },
    "discovery": { "ports": [{ "name": "http", "number": 80, "protocol": "tcp" }]}
}
}
dev-tester.json
{
"id": "tester2",
"container": {
  "type": "MESOS",
  "docker": {
    "image": "donch/net-tools"
  }
},
"instances": 1,
"cmd": "ifconfig && sleep 4h",
"cpus": 0.1,
"mem": 64.0,
"ipAddress": {
    "networkName": "calico",
    "labels": {
      "app": "tester",
      "group": "development"
    }
}
}
dev-database.json
{
"id": "database2",
"container": {
  "type": "MESOS",
  "docker": {
    "image": "oscarfonts/h2"
  }
},
"instances": 1,
"cpus": 0.3,
"mem": 128.0,
"ipAddress": {
    "networkName": "calico",
    "labels": {
      "app": "database",
      "group": "development"
    },
    "discovery": {
        "ports": [
            { "name": "database", "number": 1521, "protocol": "tcp" },
            { "name": "http", "number": 81, "protocol": "tcp" }
        ]
    }
}
}
Lets deploy them all
[laptop ~]$ ls
dev-database.json  dev-frontend.json  dev-tester.json  prod-database.json  prod-frontend.json  prod-tester.json

[laptop ~]$ for s in *json; do dcos marathon app add ${s}; done

[laptop ~]$ dcos marathon app list
ID                         MEM  CPUS  TASKS  HEALTH  DEPLOYMENT  WAITING  CONTAINER  CMD
/calico-install-framework  512  0.2    1/1    1/1       ---      False      DOCKER   None
/database                  128  0.3    1/1    ---       ---      False      MESOS    None
/database2                 128  0.3    1/1    ---       ---      False      MESOS    None
/etcd                      128  0.2    1/1    1/1       ---      False      DOCKER   None
/frontend                   64  0.1    1/1    ---       ---      False      MESOS    None
/frontend2                  64  0.1    1/1    ---       ---      False      MESOS    None
/tester                     64  0.1    1/1    ---       ---      False      MESOS    ifconfig && sleep 4h
/tester2                    64  0.1    1/1    ---       ---      False      MESOS    ifconfig && sleep 4h
As it is, all containers will be able to talk to each other. For example tester2 (dev) will be able to access frontend (prod):
[laptop ~]$ dcos task | grep tester2
tester2   10.0.1.190  root R tester2.891c8da1-6cf0-11e7-a59c-060dbac461cc  29e81d88-3429-49df-9057-4798b85d99ea-S1

[laptop ~]$ dcos task exec tester2.891c8da1-6cf0-11e7-a59c-060dbac461cc ping -c 3 frontend.marathon.containerip.dcos.thisdcos.directory
PING frontend.marathon.containerip.dcos.thisdcos.directory (192.168.218.65): 56 data bytes
64 bytes from 192.168.218.65: seq=0 ttl=62 time=0.747 ms
64 bytes from 192.168.218.65: seq=1 ttl=62 time=0.306 ms
64 bytes from 192.168.218.65: seq=2 ttl=62 time=0.339 ms

--- frontend.marathon.containerip.dcos.thisdcos.directory ping statistics ---
3 packets transmitted, 3 packets received, 0% packet loss
round-trip min/avg/max = 0.306/0.464/0.747 ms
Calico allows you to create finely grained security policies and we are going to utilize the app and group labels to create some.
SSH into any of your private nodes and download the latest calicoctl binary.
[laptop ~]$ eval `ssh-agent`; ssh-add /path/to/ssh/key
[laptop ~]$ dcos node
# Pick one of the agent IDs

[laptop ~]$ dcos node ssh --master-proxy --mesos-id=<ID-from-the-above-command>

[agentN ~]$ wget https://github.com/projectcalico/calicoctl/releases/download/v1.3.0/calicoctl
[agentN ~]$ chmod +x calicoctl
Let’s first delete the rule in the default profile that allows all containers to talk to each other.
[agentN ~]$ ./calicoctl get profile -o yaml > calico-profile.yaml
# Edit calico-profile.yaml and remove this segment under spec / ingress
#    - action: allow
#      destination: {}
#      source:
#        tag: calico

[agentN ~]$ ./calicoctl replace -f ./calico-profile.yaml
Successfully replaced 1 'profile' resource(s)
Next, let’s enable containers in the development group ping each other:
- allow-dev-pings.yaml
apiVersion: v1
kind: policy
metadata:
  name: allow-dev-pings
spec:
  selector: group == 'development'
  ingress:
  - action: allow
    icmp:
      type: 8
Now, lets create policies that will allow the tester container to access the front end on port 80 in the development group.
- allow-dev-tester-frontend.yaml
apiVersion: v1
kind: policy
metadata:
  name: allow-dev-tester-frontend
spec:
  selector: group == 'development'
  ingress:
  - action: allow
    protocol: tcp
    source:
      selector: app == 'tester'
    destination:
      selector: app == 'frontend'
      ports:
      - 80
  egress:
  - action: allow
Similarly, let’s also allow the tester container access to the management UI of our H2 database running on port 81 in the development group
- allow-dev-tester-database
apiVersion: v1
kind: policy
metadata:
  name: allow-dev-tester-database
spec:
  selector: group == 'development'
  ingress:
  - action: allow
    protocol: tcp
    source:
      selector: app == 'tester'
    destination:
      selector: app == 'database'
      ports:
      - 81
  egress:
  - action: allow
We would also need our fictitious application to access the database on port 1521 in the development group, so lets add that policy also:
- allow-dev-frontend-database.yaml
apiVersion: v1
kind: policy
metadata:
  name: allow-dev-frontend-database
spec:
  selector: group == 'development'
  ingress:
  - action: allow
    protocol: tcp
    source:
      selector: app == 'frontend'
    destination:
      selector: app == 'database'
      ports:
      - 1521
  egress:
  - action: allow
And finally, lets allow ingress traffic from your company’s LAN to the front end in your development group:
- allow-dev-lan-frontend.yaml
apiVersion: v1
kind: policy
metadata:
  name: allow-dev-tester-database
spec:
  selector: group == 'development'
  ingress:
  - action: allow
    protocol: tcp
    source:
      net: '<your-lan-CIDR>'
    destination:
      selector: app == 'frontend'
      ports:
      - 81
  egress:
  - action: allow
With all the desired policies for the development group in place, lets apply them all:
[agentN ~]$ ls
allow-dev-frontend-database.yaml  allow-dev-pings.yaml            allow-dev-tester-frontend.yaml  calicoctl
allow-dev-lan-frontend.yaml       allow-dev-tester-database.yaml  calico-profile.yaml

[agentN ~]$ for p in *yaml; do ./calicoctl create -f ${p}; done
Run the dcos task exec command from the context of development group tester container to verify our policies:
[laptop ~]$ dcos task | grep tester2
# Assign the task ID of tester2 to an
# environment variable, for example TESTER2ID

# These should work:
[laptop ~]$ dcos task exec ${TESTER2ID} ping -c 3 frontend2.marathon.containerip.dcos.thisdcos.directory
[laptop ~]$ dcos task exec ${TESTER2ID} curl frontend2.marathon.containerip.dcos.thisdcos.directory
[laptop ~]$ dcos task exec ${TESTER2ID} curl database2.marathon.containerip.dcos.thisdcos.directory:81

# Pinging or accessing anything in the production
# group from the development group should _not_ work
[laptop ~]$ dcos task exec ${TESTER2ID} ping -c 3 frontend.marathon.containerip.dcos.thisdcos.directory
[laptop ~]$ dcos task exec ${TESTER2ID} curl frontend.marathon.containerip.dcos.thisdcos.directory
Conclusion
Hopefully this long blog post made sense and you should be able to adjust the provided marathon definitions and Calico policy yaml files to work with the production group.